
Pantograph in Power Panto Mode- Quiltmagine

From the home screen of your software select Pantograph
Then following the prompts on the screen set the Safe Area.

The software will default to the new Power Panto Mode.

You can now set the height and width of your quilt – Tap the Ruler Icon in the menu bar at the top of the screen

Move your machine to the top left corner of your quilt top, and Tap the left side of the Ruler, then move your machine to the top right-hand side of our top and Tap the right side of the Ruler as shown in the diagram below.

Now tap to select the Sewing Machine icon 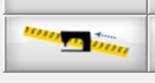
Your Machine will now move to the top of your quilt – to the centre point – this is the centre of the measurements just taken. We need to mark this position – use your preferred marking tool – I like to use a blue water-soluble pen.
You will now Tap the Apply Measurements Icon to record this measurement

Now that the width of your quilt is recorded, you will need to set the total height of the quilt top. Tap to select Total Height from the pop-up menu and type in the total height of the quilt. (Remember, this is the full height of your quilt top, not the safe area).

Tap Select Pattern either from the menu bar or the icon on the screen as shown below

From the Continuous Line folder select your desired pattern – in this example I have selected hearts.gpf –Tap to select design – then tap Open to select, alternately, double click on the design.

I have Tapped the check boxes – Show Safe Area and Sew Through Clipped
The Red outline now displayed on the screen is our safe area,

You can now use the Sizing and Spacing options to create your desired quilt pattern.

Start by changing the Sizing, using the + and – keys, set the pattern Height. Next, change the Spacing using the + and – keys. This spaces the patterns by making them either closer or further apart. You can adjust the vertical or horizontal spacing. The Pattern Fitting check boxes adjust the horizontal and vertical wrapping. To see the changes to the horizontal wrapping of the design check the left box – for vertical check the right box.
Tap the Dominoes Under the Flip X – to move patterns around, try them out – if you want you can always reset – Tap the Reset Icon from the menu at the top of the screen.
If would like to show a grid in the background Tap to select Options from the Menu at the top of the screen. From the pop-up menu check Show Grid. The grid lines are spaced at 1 Inch. Tap OK to close.

For this example, I have set the Vertical Spacing at 0.5, checked the Pattern Fitting to the right and now to take a closer look at the design Tap the Magnifier at the top of your screen in the Menu bar

Tap along the bar to magnify – tap Fit to go back to normal screen, - your Sizing, Spacing, flip etc Icons are still active for any changes you might want to take whilst the design is magnified.

To save the design simply Tap the Save Panto Icon - Name your quilt and select Save.
Now Tap the Sew in Zones Icon on the bottom right of the screen

A pop-up will appear asking you if you would like to save your Zone Sewing Session. If you have already saved your design then select No – if you didn’t its really recommended in case you need to come back to the quilting at a later date.

We are now in the placement screen – the red box around the design is displaying the safe area. The design is now ready to be placed. Move your machine to the original mark you made at the centre position at the top of your quilt. When you are in the correct position Tap the Green Placement Icon with the yellow dot I it to place the pattern.

Next, Tap Zone Manager

The Zone Manager screen will open.

You will see that the selected Zone has a green outline with the number 1 displayed – each time you advance the quilt when the quilting is finished it will automatically proceed to the next zone. Taping the Blue Arrows will let you scroll between zones showing you how many zones there are. Important, the Zone selected is the one that will sew once you tap OK. Each subsequent zone will have a number in red displayed, surrounded by the green box.
Important : If you don’t complete your quilt in one session and need to close the program down – simply open the saved file by Tapping Read Panto, open your saved panto, Tap Sew in Zones and then Tap Zone Manager. Using the blue arrows, scroll to the desired zone you need to resume quilting. Tap OK, you will be back in the quilting screen, move your machine to the last mark made on your quilt top select the Green Placement Icon to register and continue quilting.


Zone Sizing – by default, the width of the zone is set at 100% - This is because your safe area should be wider than your quilt. Zone Height scale % cannot be 100% because this would make it the same height as the safe Area. It is recommended not to be more than 90% - if you change the % height it will remain until you change it. If you make changes this will not affect the size or pattern. You can change it by tapping the number in the pop-up keypad, tap OK when finished.
Setting Zone Preferences – this determines how you would like to place the design and direction of sewing.

You have 2 options for your Zone Placement – Tap the ? For the pop-up menu for detailed information about placement methods.

You can also select the Zone Start Position, Tap the ? Icon - for detailed information about the start positions

Finally, you can select the Sewing Direction - Tap the ? Icon for the pop-up menu – for detailed information about the sewing directions

Once all selections have been determined Tap OK at the bottom of your screen to return to the quilting interface screen.
From the menu bar at the top of the screen Tap to select Settings

In this screen you will select Sewing Speed – Medium is recommended – you can also change the number of Tie of stitches and Tie-off Mode – etc Tap OK when finished.
The Zone was previously placed so tap the Sew Icon. If you’re unsure go ahead and move your machine to the mark you previously made at the centre point at the top of your quilt and tap the Green Placement Icon to place the Zone again. Following the prompts on the screen quilt the first Zone.

Once the Zone has been quilted, Tap to select Tool Box, then Release Carriage, now Pull Bobbin- follow the prompts on the screen.


Tap Finished Zone! at the bottom of the screen to proceed to the next Zone. The pop-up screen will prompt you – select Yes

Follow the prompts on the screen. When you have ensured the needle is up tap OK.

There are 3 choices for marking that you can choose – Tapping Marking Method allows you to chose from these options. You can use your prefered marker – Blue water solouble pen – chalk pencil – painters tape etc.
The center of the “1” inch mark reprensents where the single stitch mark is – Single stitch is litterally a single stitch – once you have marked the position Tap Continue
A Prompt will appear on the screen. If you have placed your zone marker Tap Yes


Following the prompts and making sure the needle is up Tap OK - you will now advance your quilt until the mark you made is under the foot – its ok it doesn’t need to be perfect. The pop-up boxes will take you step by step through this process.

Now Tap OK – Now you can move your machine to the mark exactly and Tap the Green Placement Icon to place the next zone.

Note the Zone Centre shows Zone 2. – Before sewing Zone 2 – make sure you have basted down the side edges of the quilt top.
You are now ready to sew Zone 2 – Tap on the Sew Icon. Repeat the steps following the prompts on your screen to complete your quilt.
If during quilting your bobbin runs out or your thread breaks Tap the Stop button located on the bottom of the sewing interface.

Next, Tap the Release Carriage Icon - Then Tap the Repair Pattern Icon
Move the machine to the side of your quilt and either replace the bobbin or fix the top thread depending on which was the cause of the breakage. One you have the machine threaded, move the machine to were you would like the pattern to begin again. When you are ready to continue stitching, select the Closet Stitch Icon

The machine will go to the closest stitch in the pattern. Using the tools above you can Nudge the needle across or down by using the Blue Arrow Keys to ensure the placement is correct. You might like to trace forward just to be sure. You will now need to Pull Bobbin. Once you are happy with your choices simply Tap Sew to resume sewing.
Sometimes when you have reached the last row of your quilt you need a partial zone at the bottom. Move your machine and mark the placement of the top of the zone, as you have done in previous zones.

Once the zone is placed, the Partial Blue Diamonds Icon became active (if the zone has not been placed they will remain greyed out).
Now move your machine to the lower edge of the quit and Tap the Partial Blue Diamonds Icon to select it.

Don’t Panic when the screen turns pink – this is ok! – this is how you know it worked as it has cropped the design to fit. Tap Sew to complete the zone.
Congratulations, your first Power Panto quilt is completed.