
For Nolting Quilting Machines
How to Quilt Simple Sashings using Quiltmagine
To be able to do this tutorial I am assuming that you already know how to set up a Panto, as we need the design to be continuous. I have set up my design using a built in design from Quiltmagine

The design is call Curlycue. Set the Height and Width of the pattern. Once you are happy with design save it with an appropriate name. Ok, so this was all pretty standard, now select Quilt As Rows.
This now gives you the option to place the design as if you were in the Select & Sew Pattern Menu.

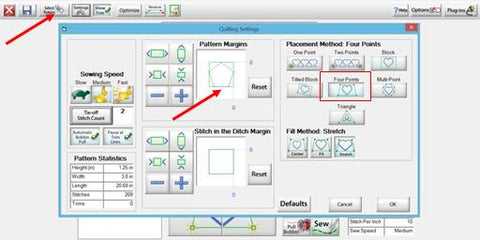
Select Settings, this will allow you to choose the placement method. You can set the sashing both horizontal or vertical to suit the quilt. You can also set the pattern margins so that it stitches 1/8 inside the area.
I Have selected that it stitch 1/8 inside the area, but have not adjusted the edge of the design area.


If you wish to add a further design element to the quilting you can also use this function to stitch the ditch.
Once the desired pattern has been stitched, select the ditch Icon in settings.
You can then stitch in the ditch or even go one step further and set your preferred stitch margin. For instance, you might like to make it a feature and stitch inside the ditch by ¼ Inch.
Happy designing.