
Select & Sew Power Placement - Quiltmagine

From the home screen of your software select Select & Sew Then following the prompts on the screen set the Safe Area.

To set the Safe Area – move the machine to the top left corner of your quilt backing as shown below and tap within the Red Rectangle at the centre of the screen.

Now move the machine to the bottom right of the quilt backing as shown below and tap within the Red Rectangle at the centre of the screen.

Now that you have set the Safe Area the machine will be able to sew any design placed withing this area.
The software will now open our block Library
You can now use the Blue Arrows at the side to scroll through the design pages – if File Filtering is checked in the menu bar at the top right of the screen you can tap the bottom window pane and type the name of the file in the keyboard that pops up. This will make finding favourite files easier.
To select the Block3.gpf, simply double Tap the block3.gpf file icon and the software will open the Power Placement screen.


We can now place the selected pattern by Tapping the gray Placement Nodes – move the machine needle over the corresponding position of the quilt top – tap to place and the node will become active – it turns green. Repeat for each of the Placement Nodes

At the bottom of our screen we have a menu – Check Show Pattern Size – this will then display the size of the block in the up Left of your screen. ie (9” inch width x 8.5” inch height), these will change according to margins and placement choices. Check Show Grid to place a 1 in grid behind your pattern if desired.
To change placement methods – Tap All - from the pop-up menu you will see all the options for Placement Methods - or use the blue arrow keys to scroll through them.

In this tutorial I will be using the Four Point placement method, I have also chosen the Stretch option
– this will adjust the pattern to the accurate dimension of the block. This is a great option in case the block is not perfectly square. At any time if you do not like your selections, Tap the Reset Icon in the Menu displayed under the All Icon.
Once you have placed you block using the Placement Nodes you will see that they are all now green. At anytime you can move your machine and Tap the corresponding Placement Node if you would like to make a tiny adjustment. There is no need to reset all Placement Nodes, only the ones you wish to reposition.

You may Flip your pattern either Horizontally or Vertically – Tap the blue arrows to see what the design does. If you wish to revert to the previous setting, you can Tap Flip X to reset.


The Margins Icon allow us to decrease or increase the size of the pattern to be quilted in the block area – Tap the Yellow Lock to Unlock – this will allow you to alter the vertical or horizontal margins to suit. If Locked to will automatically alter both margins equally. If you need to Rotate the design you can use the Blue Arrow keys – Reverse the direction by Tapping the Reverse icon or Tap Rotate and a pop menu appears for you type your desired rotation. Tap OK to apply.


Because I set margins on the block, you now see a feint grey box around the placed design, if I check the Ditch Icon it will allow me to stitch the Ditch Line shown in grey, as well as the block design. Tap Reset at the bottom at any time to go back to default of “0” Margins
Tap on the left of the screen to select Tool Box, a Menu will drop down with options.
As you Tap each selection – you will see different options appear in the display. Tap the up/down arrow to scroll through options.

Use the arrows to go down to Ruler, a new screen appears shown below.

This option allows you to measure the distance between two points on your quilt top. Move the needle on the machine over the start point and Tap Start Point Ruler, next move your machine needle to the next position and Tap End Point . Tap Move to and the machine will move to the centre of the measurement that you took. You will see the measurement displayed under the Length Icon.
You may need to Tap the Release Carriage Icon – this will allow the carriage to move freely while taking your measurements.
Use the arrows to go down to Marking Tool, this is fabulous for adding defined additional markings on your screen in relation to placing blocks. You can also select to stitch the markings once they have been placed.

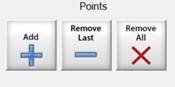
Move your machine to the correspond position of the first mark Tap Add +, move to the next position and Tap Add +, continue doing so to create the markings require. You can remove the last mark made by Tapping Remove Last, or Remove All if you wish to remove all the markings. The marking placed will form a continuous shape/ line.
To add multiple markings – Tap Add Marking when the first shape/line is completed. You will see a pop-up menu keyboard. Here you can name the next marking, Tap Enter. The software by default has named the first mark as No 1. Now move your machine and Tap Add +, continue until you have the desired markings displayed on your screen. – You can Remove Selected or Remove All at any time, use the Blue Arrow at the bottom to scroll through your markings

Important note: The Pattern needs to be placed before adding markings. You do not have to stitch markings, it is a great tool to see if the design is going to stitch over an applique.
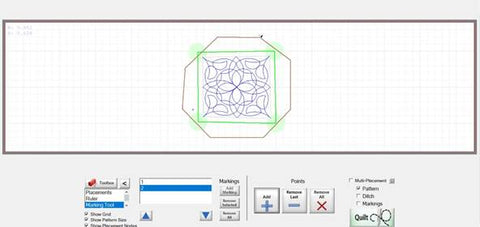
Now that the pattern has been placed there are 3 option to choose. You will need to check either Pattern, Ditch or Markings – only those checked will sew. You can check one or more at a time.

To quilt the placed pattern, Tap the Quilt Icon - this located at the bottom Right of your screen.

Now tap Settings from the menu bar at the top of your screen to get the pop-up menu for Quilting Settings


My preferred settings are Medium for Sew Speed – this is the recommended option for most quilting, - Slow is for very intricated detailed patterns. Select how many Tie-off Stitches you would like the machine to do and we also can set the Stitches per Inch according to your desired preference. Micro Stitch, if selected, does tiny Tie Off Stitches – or tap to select Back and Forth Method.
Touch Optimize at top of screen in the menu bar.


This screen allows you to see how a pattern will stitch (by touching Animate Stitching) and also make any desired changes to start and end points, sewing direction and jump stitches (long stitches between start and stop.
The Red and Green Nodes are the stop and start of the design. A Blue Node will show a break in the path of stitching. Tap OK at the bottom of the screen to return to quilting screen

You can choose to Trace a design before stitching out a pattern. If you tap stop whilst tracing, a menu will appear allowing you to resume – back and forth or trace from Start or End.

When you are happy to start stitching you will need to pull the bobbin thread to the top of the quilt. Tap the Pull Bobbin Icon, following the prompts on the screen


Tap OK machine will move to start position –
Tap the Single Stitch Icon – and pull bobbin thread up through the quilt sandwich. Tap Move Away this will give you better access to the bobbin.
Tap the Move Back Icon to move back to position. Now Holding the thread firmly between your fingers Tap the Sew Icon for the machine to start Quilting. – You can choose your preferred method of either burying the threads later or choosing to snip them.
If at any time your bobbin runs out or your thread breaks Tap the Stop button at the bottom of the screen. Follow these steps to Repair your Pattern.

First Tap the Release Carriage Icon - Then Tap Repair Pattern Icon
Move the machine to the side of your quilt and either replace the bobbin or fix the top thread depending on which was the cause of the breakage. One you have the machine threaded, move the machine to were you would like the pattern to begin again. When you are ready to continue stitching, select the Closet Stitch Icon

The machine will go to the closest stitch in the pattern. Using the tools above you can Nudge the needle across or down by using the Blue Arrow Keys to ensure the placement is correct. You might like to trace forward just to be sure. You will now need to Pull Bobbin. Once you are happy with your choices simply Tap Sew to resume sewing.

When your design has finished stitching, Tap the Finished! Icon – you will return to the pattern placement screen.
Congratulations you have now stitched your first Block in Power Placement.